Getting Started With The Client Dispute Manager Software

What is Client Dispute Manager Software?

Credit Repair Software for Business

Client Dispute Manager Software is a Credit Repair Business Software that allows you to take your business from zero to the next level. It is a complete business-in-a-box that delivers the core training you need to start, run, and grow your credit repair business.

A CRM allows you to learn and earn simultaneously and have the flexibility to achieve your dreams of becoming your own boss. With it, you can set up easy automation and integrations that will allow you to make your day-to-day task easier.
Run your business while ensuring that every customer you take in feels the value of your services. Continuously grow your business with training and features that make it easy to expand and market further.
This step-by-step process will easily guide you using the Client Dispute Manager Software.
Are you ready to turn your dreams into reality? Let’s get started!
Be your own boss. Set your own schedule and travel when you want. Start a credit business today.
Click here to get everything you need for FREE.

Step 1: Company Set Up

Once you access the credit repair software, it is best to initially set up your company profile and information to align all reports and any outgoing emails from the software.
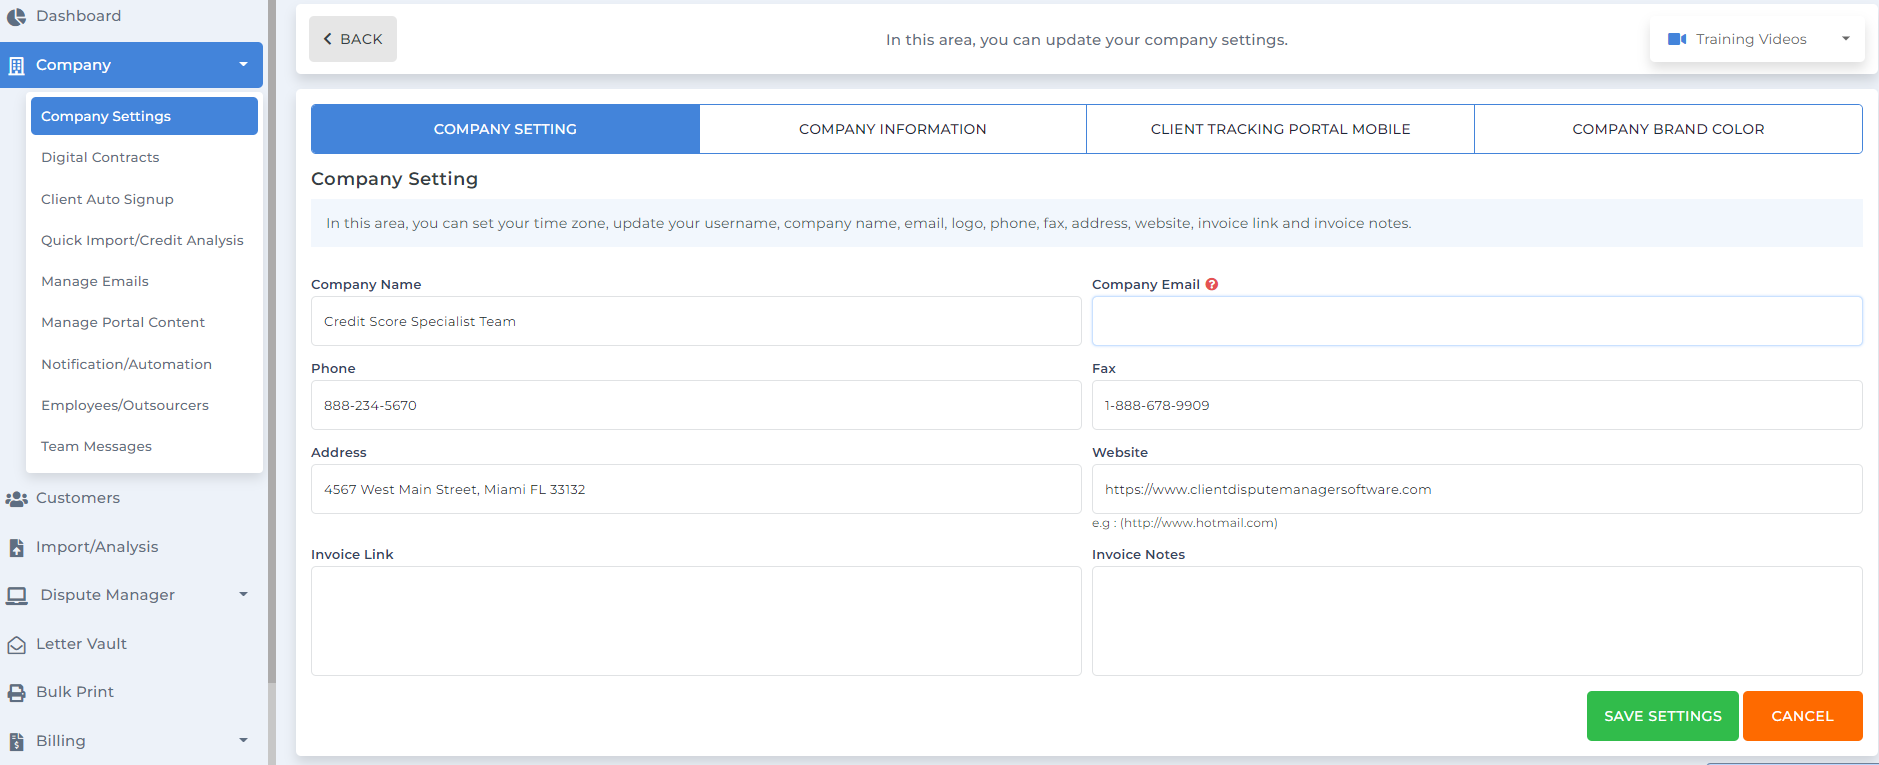
1. Go click on the Company tab
2. Choose Company Settings
Add in your company information; this will be used to brand all across any communication, portals, reports, and outgoing documents from your software access.
Credit Repair Business Software
Next is to set up your contracts and onboarding process. Go to the same tab and look for Digital Contracts and Client Auto Signup from the drop-down menu; this will allow you to create and build your contracts as well as manage your automated onboarding process.
Credit Score Specialist
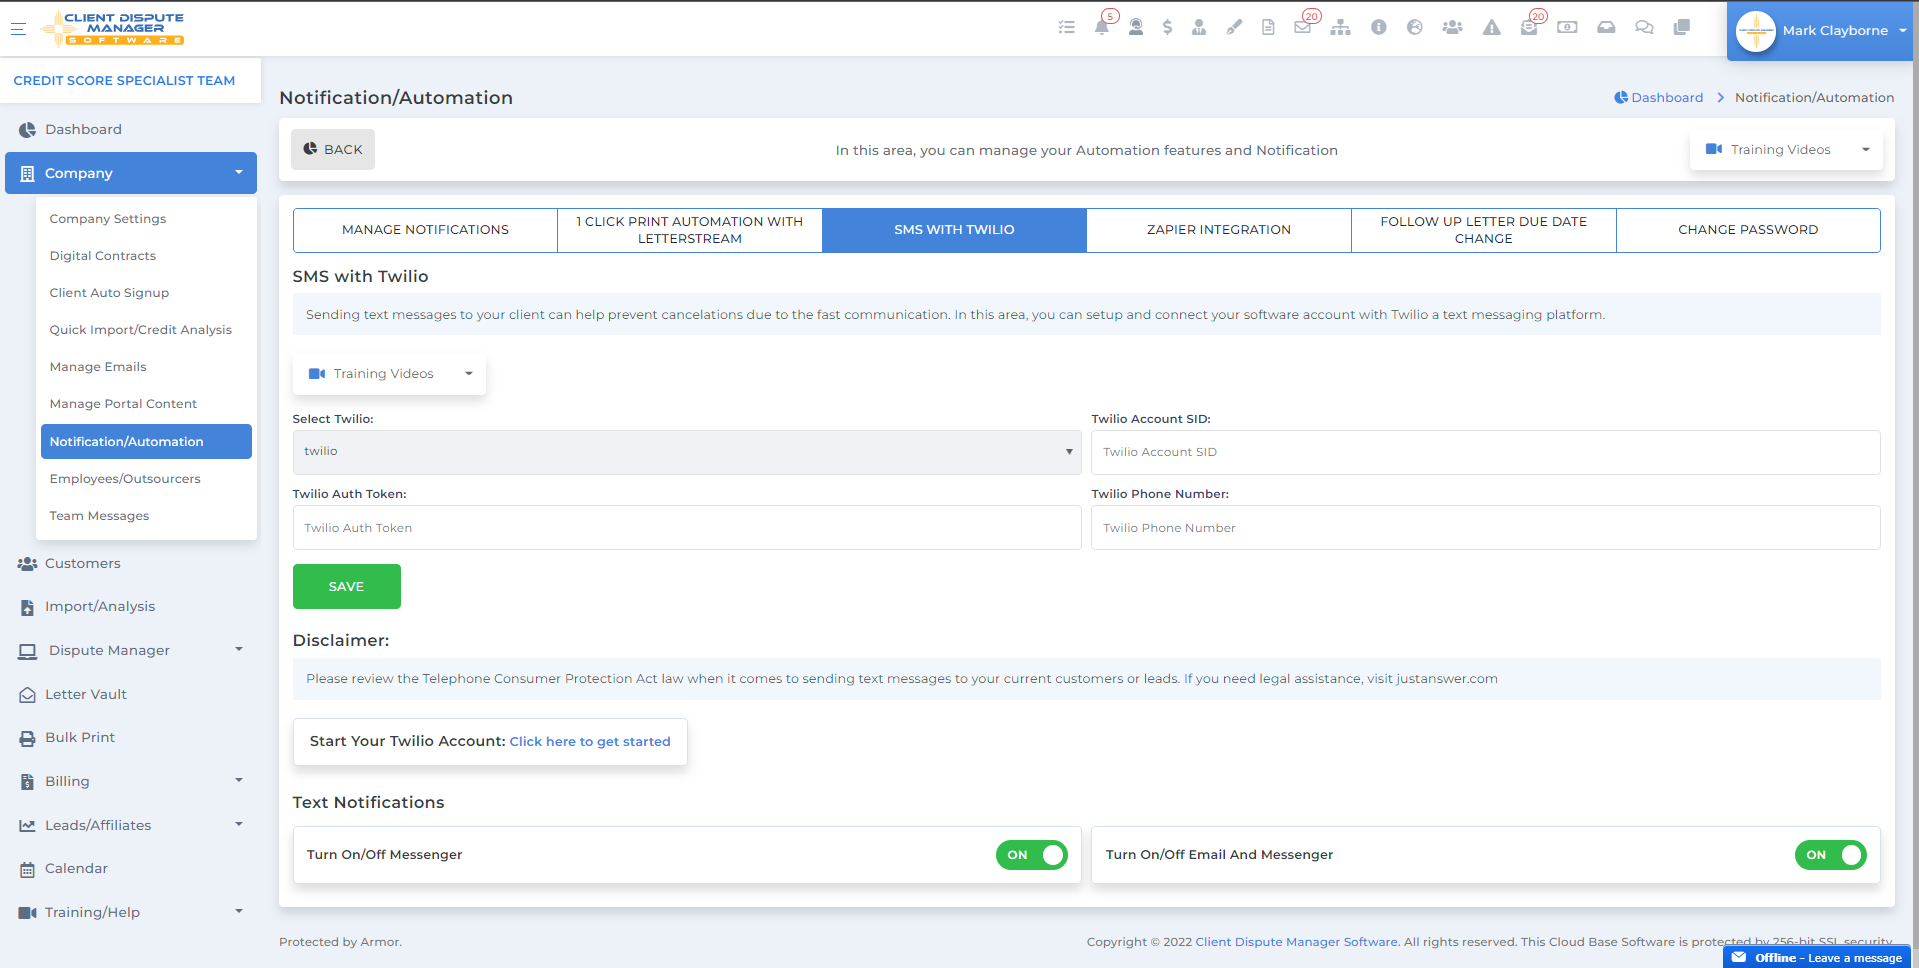
Lastly, to complete your set-up, go to Manage Emails and set up all your outgoing emails as well as any integration you look to accomplish through the Notification/Automation screen.

Step 2: Adding Your First Client in the Client Dispute Manager Software

Now that we have set up your company profile, you are ready to add your first client.
The Client Dispute Manager Software provides you with different ways of adding your client in. A credit repair business software gives you an option to add clients through the following methods:
  • manually
  • import through CSV files
  • integrate lead forms to your website

Adding Manually

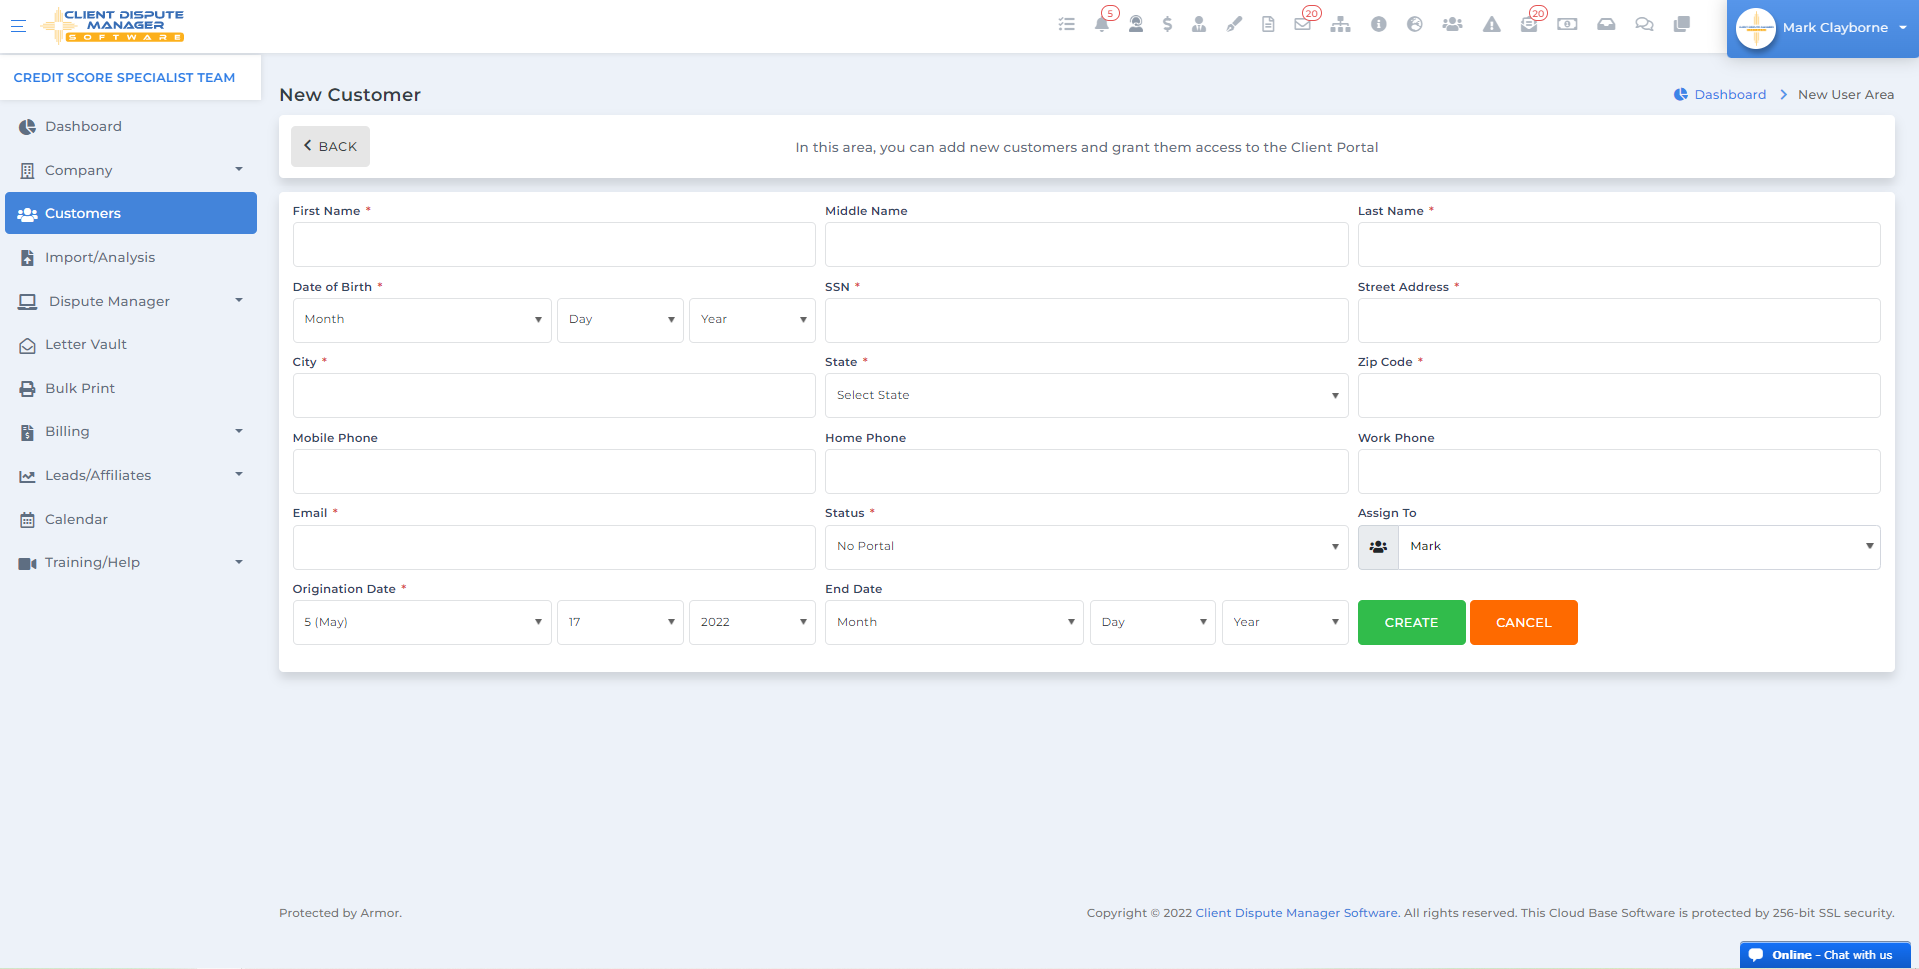
You can add easily through the dashboard by clicking add new customer or add quick lead.

Add New Customer

This allows you to add clients with their full information, including date of birth, address, and all the basic data you need.

Add Quick Lead

This will allow you to get leads easily or while on the go.

Importing through CSV files

This is a very effective way for those who have been in the industry for quite some time. For those who had their clients in an excel file or may be coming over from a previous tool, you can easily import and add your entire client’s information at once.

Using lead forms

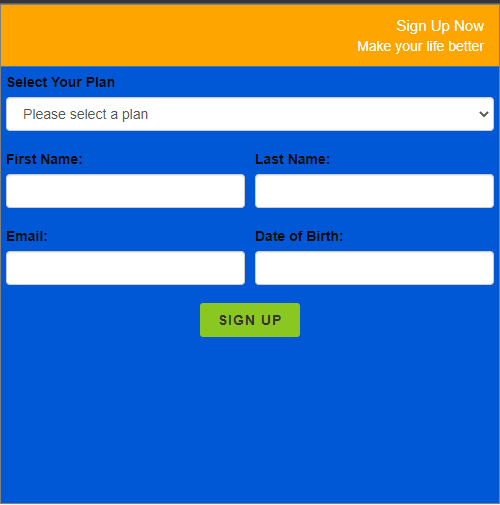
The credit repair software has lead forms that you can easily design and integrate with your website. It allows you to set up your first automation, a way to add clients and have them go through the onboarding while you sit back and relax.

Step 3: Client Dispute Manager Can Automate the Client Auto Sign-up

  1. Choose between setting up a lead form or sending a contract manually through the customer screen. You may set up a Client Auto Sign-up lead form to further automate the sign-up and onboarding process by integrating the lead form to your website.
  2. The Client Auto Signup Process

Welcome Page  – sets the expectation and gives early instructions on what they will go through.

The Agreement –  review and sign the contract and disclosures.

Customer Information – provide all other basic information you need.

Billing Information – collate necessary information to proceed with billing as needed.

Credit Monitoring – collate credit monitoring information to import the credit report easily.

Document Upload – providing initial documents like proof of identification.

Thank You – a message to let them know they completed the process.
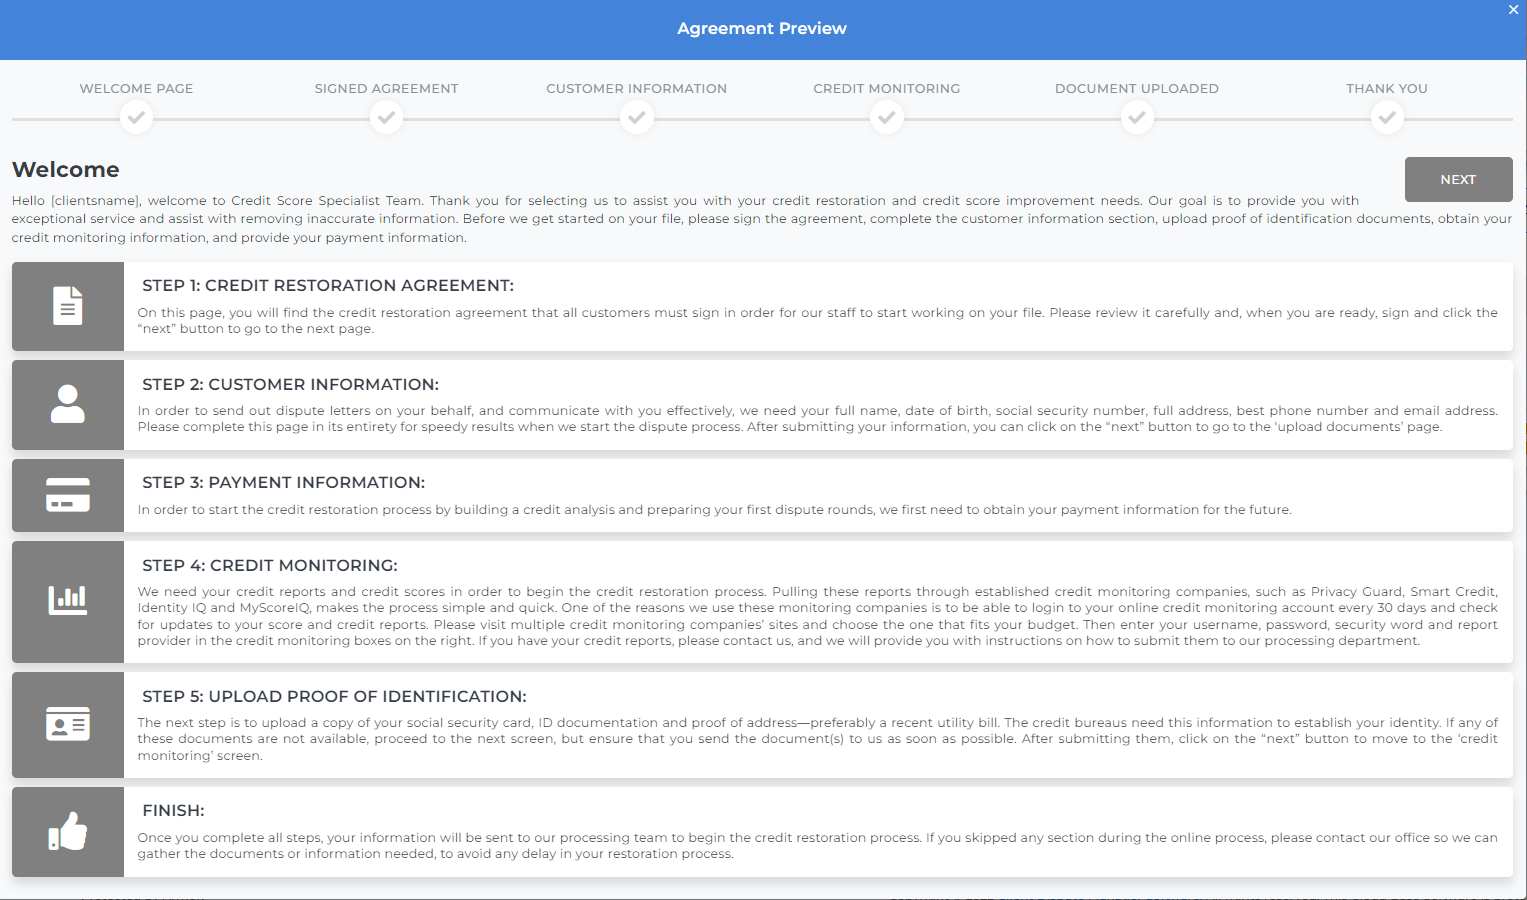
These steps are fully automated and triggered by sending them a contract; this allows you to be ready with all you need to start your dispute process.

Step 4: Import the Credit Report to the Client Dispute Manager Software

This is the first step to preparing for building your disputes. The Client Dispute Manager Software has come up with a fast way of importing as well as building necessary reports at the same time.

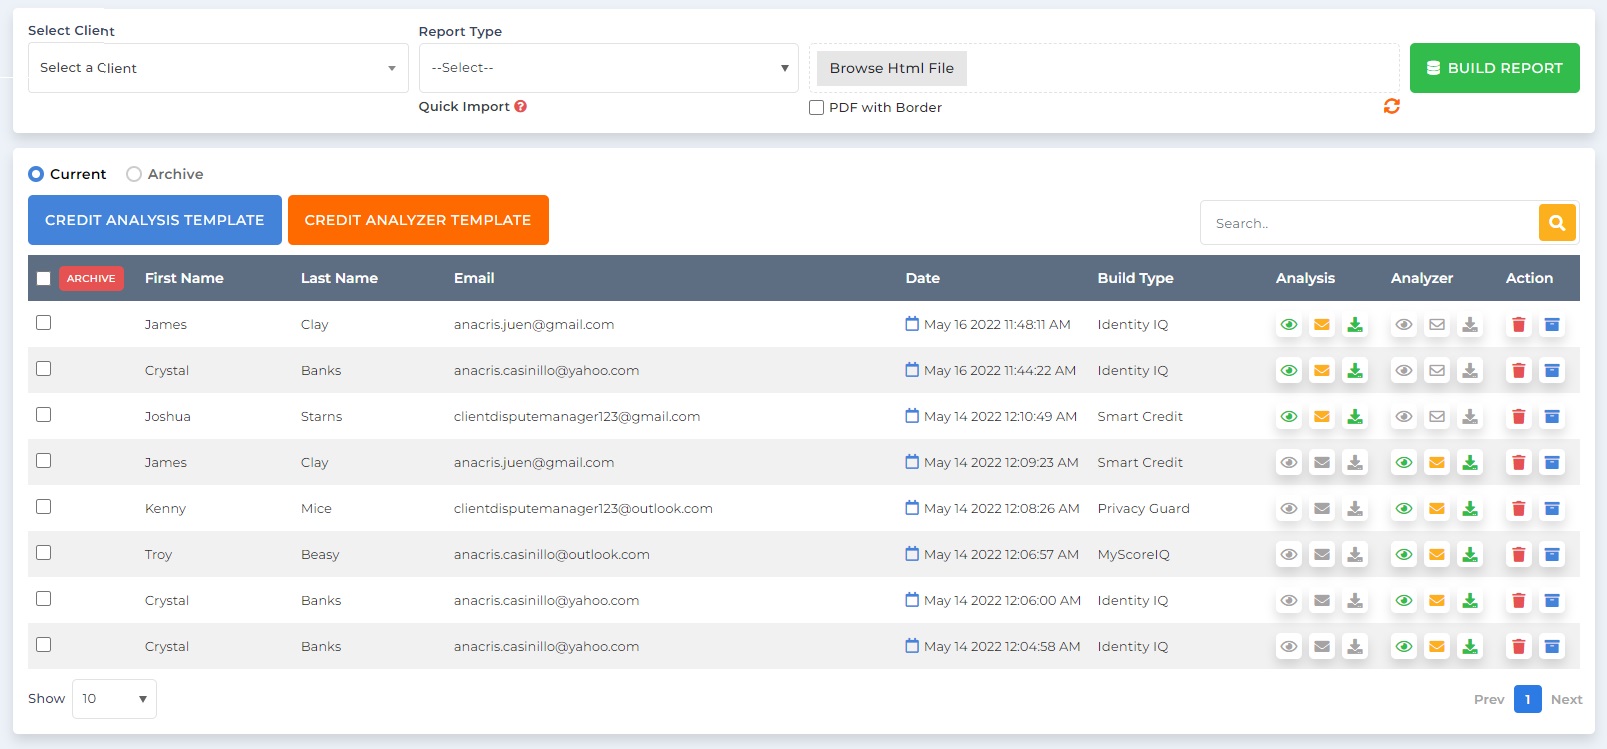
Introducing the Import/Analysis Screen

Build reports instantly and import the accounts or items you need to work on simultaneously.

Reports you can build using Client Dispute Manager Software:

Credit Analysis Report –summarizes all inaccurate negative items on the credit report, highlighting the credit report’s key factors.
Credit Analyzer Report – shows the discrepancy between the credit bureaus.
Quick Import – importing the credit report with a click of an icon and building the reports at the same time in a matter of seconds
For us to maximize the importing, we must use any of the four compatible credit monitoring companies
  • Smart Credit
  • Identity IQ
  • My Score IQ
  • Privacy Guard
Be your own boss. Set your own schedule and travel when you want. Start a credit business today.
Click here to get everything you need for FREE.

Step 5: Send Out the Smart Interviewer

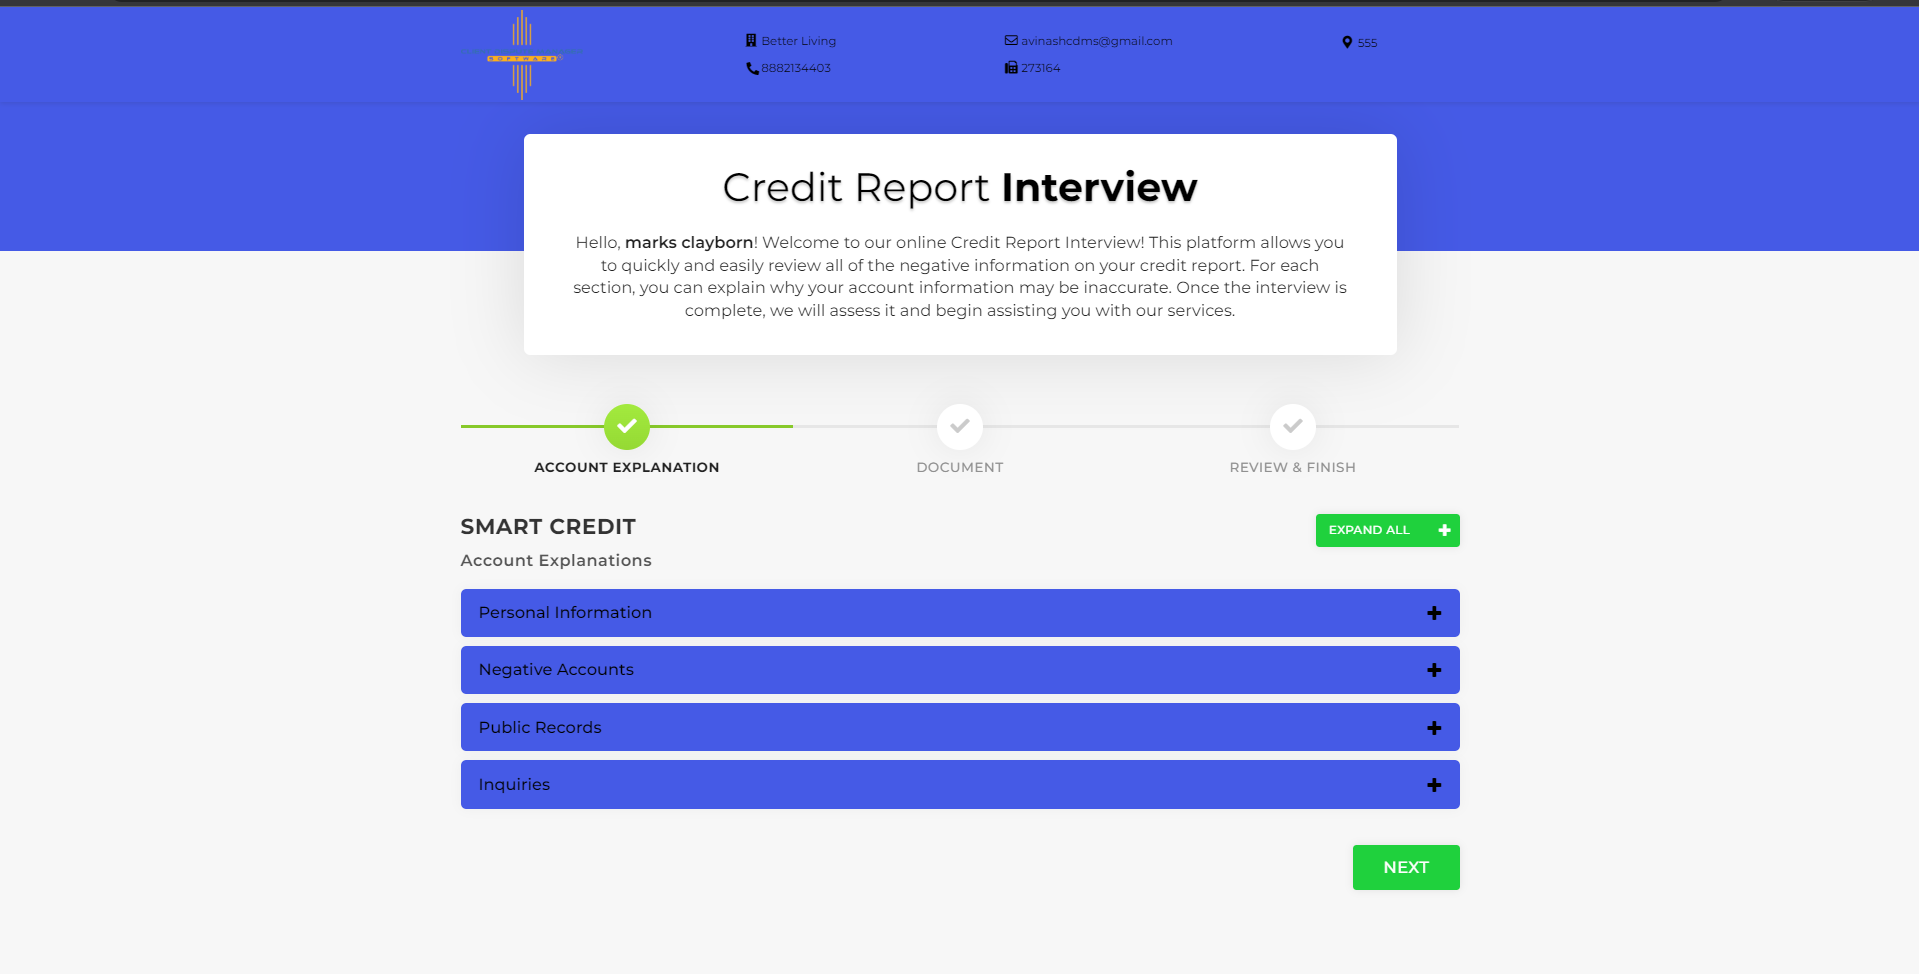
The interview process is another crucial part of your procedure as it provides you with a deeper understanding of the situation and history of the accounts in the credit report.
Now, setting up an interview can be a hassle to you and your client, so to resolve this, The Client Dispute Manager Software created the Smart Interviewer feature.
Indeed, it is an automated way of interviewing your clients; no more hustle, no need to go back and forth to get a schedule. Just activate the interviewer in the software and let your clients have the convenience of going through the process at their phase and time while you focus on other parts of your business.

Step 6: Add Your Disputes

At this point, you are now ready to build your first dispute letter. You have everything you need from the previous steps, from collating information to importing the credit report to gathering feedback from your client through the smart interview.
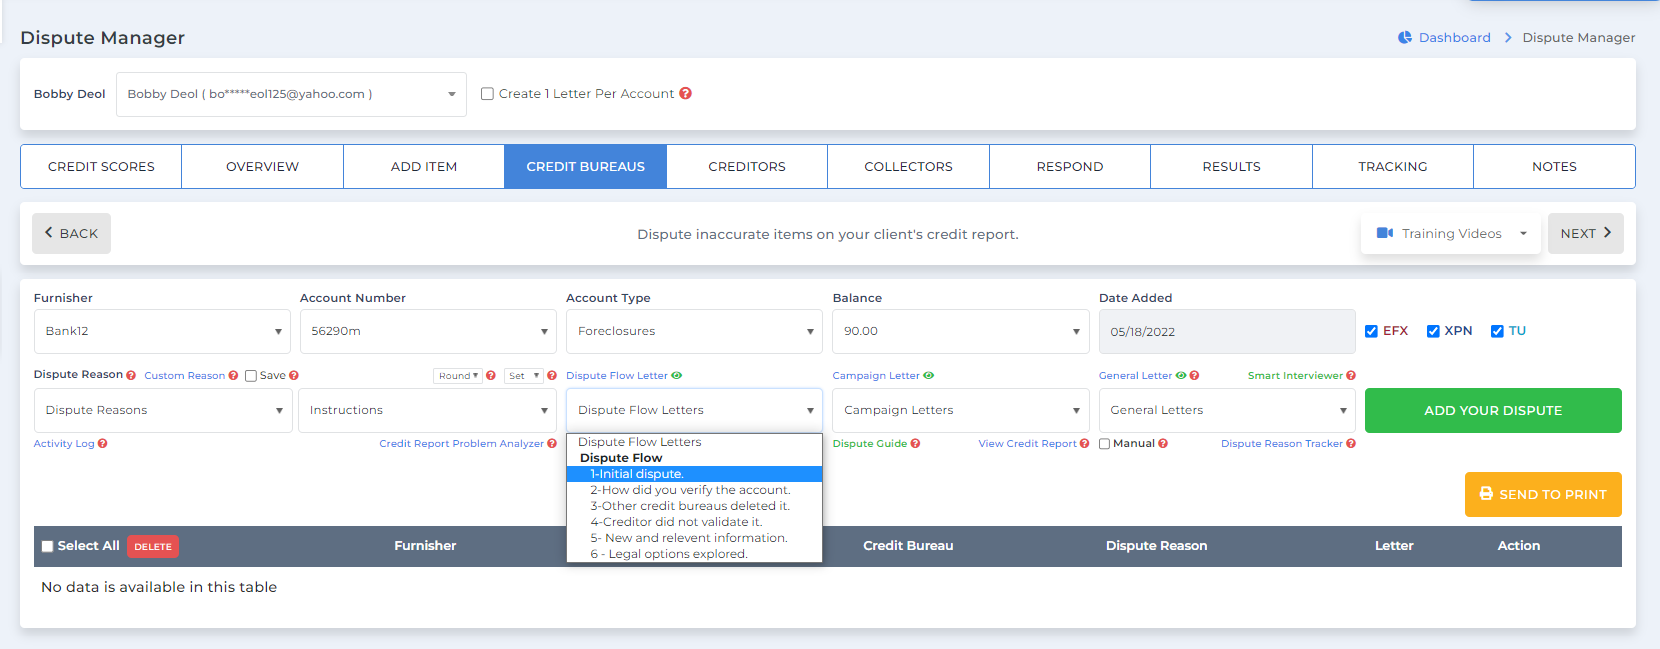
To build your dispute — organize which accounts you will be working on through the Add Item Screen.
If you are creating a letter for the credit bureaus, you have to determine your method first.
Do you want to build one letter, one account? Or do you want to do one letter with multiple accounts in it?
Let the software know, uncheck or check the tick box.
Then follow through using the four easy core steps to build a letter.
  1. Choose a furnisher you want to work on
  2. Choose a reason/instructions – You can maximize the analyzer report, and the smart interview results in determining your results
  3. Choose a letter
  4. Then click add your dispute – sending the letter/s to the bulk print screen

Step 7: Understanding the Letters

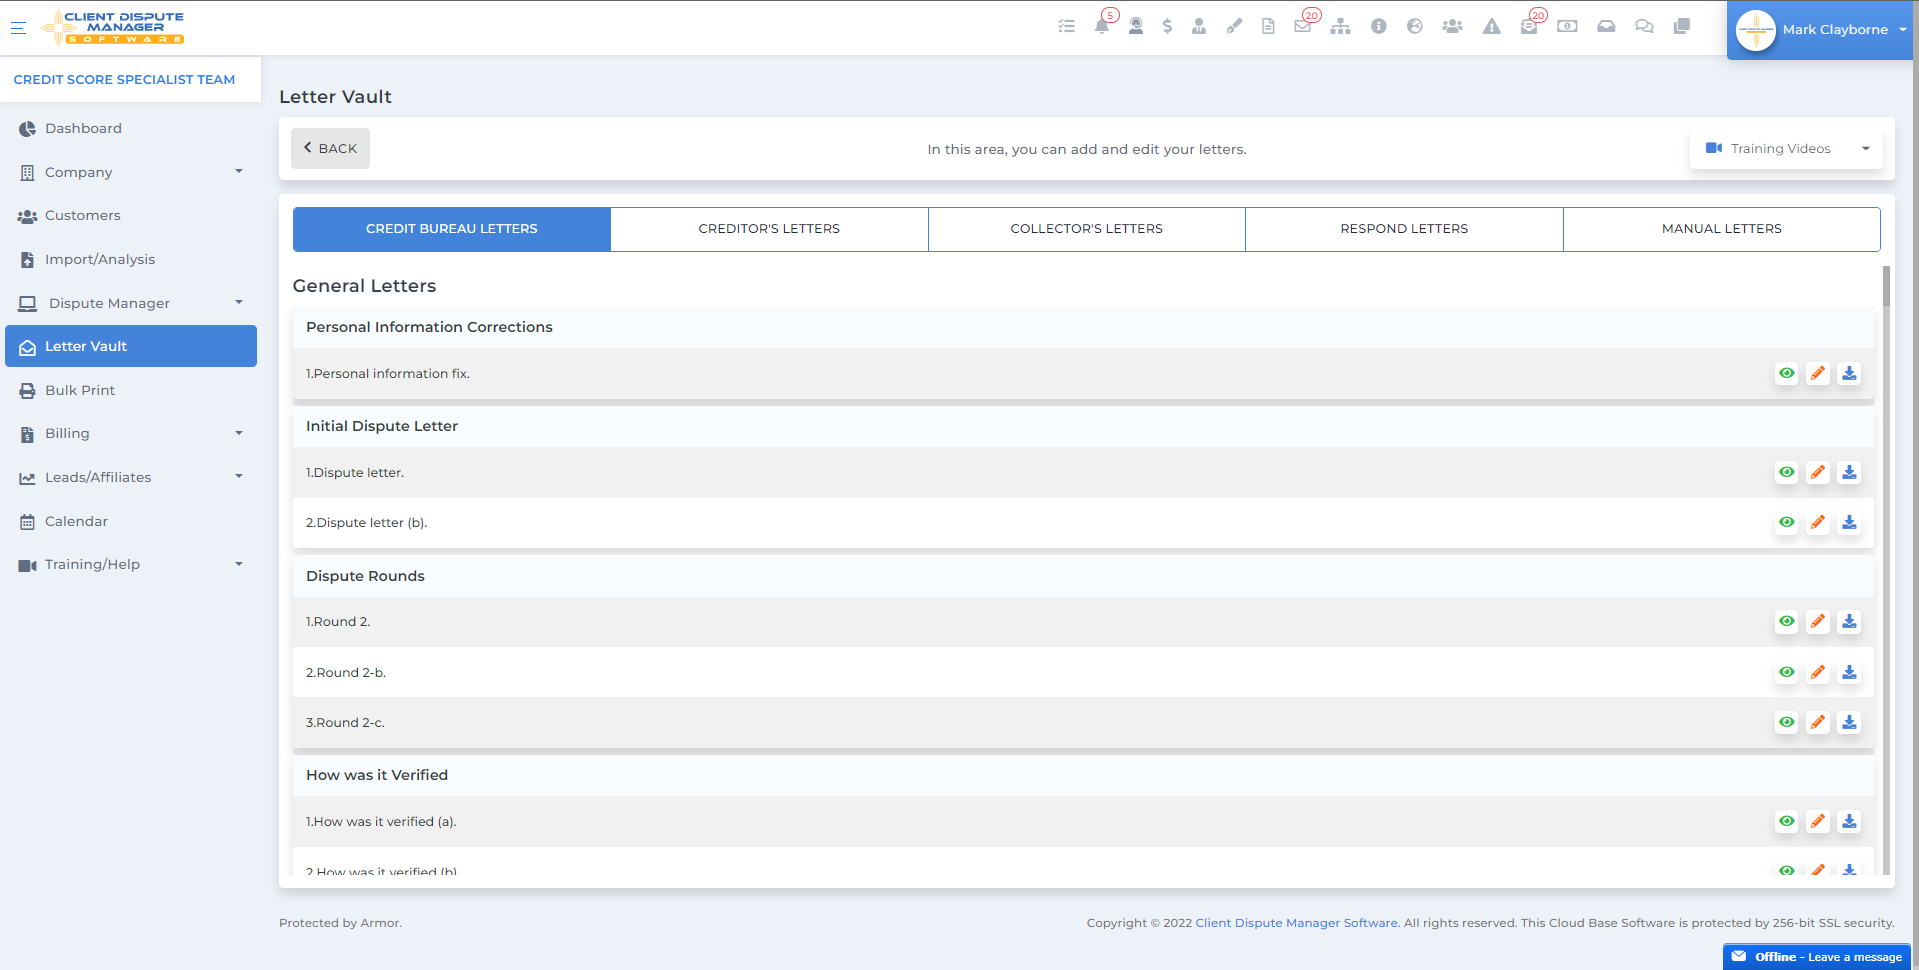
Now, you may be thinking about how to pick and choose a letter when the Client Dispute Manager Software offers four different categories, totaling more than 293 letters.
Let me help you understand each one
  • Dispute Flow – a structured set of letters for 6 months.
  • Campaign Letters – a structured set of letters for 6 months per nature of the account.
  • General Letters – contains personal information fix and letters you can mix and match.
  • Manual Letters – your letters you uploaded in the software
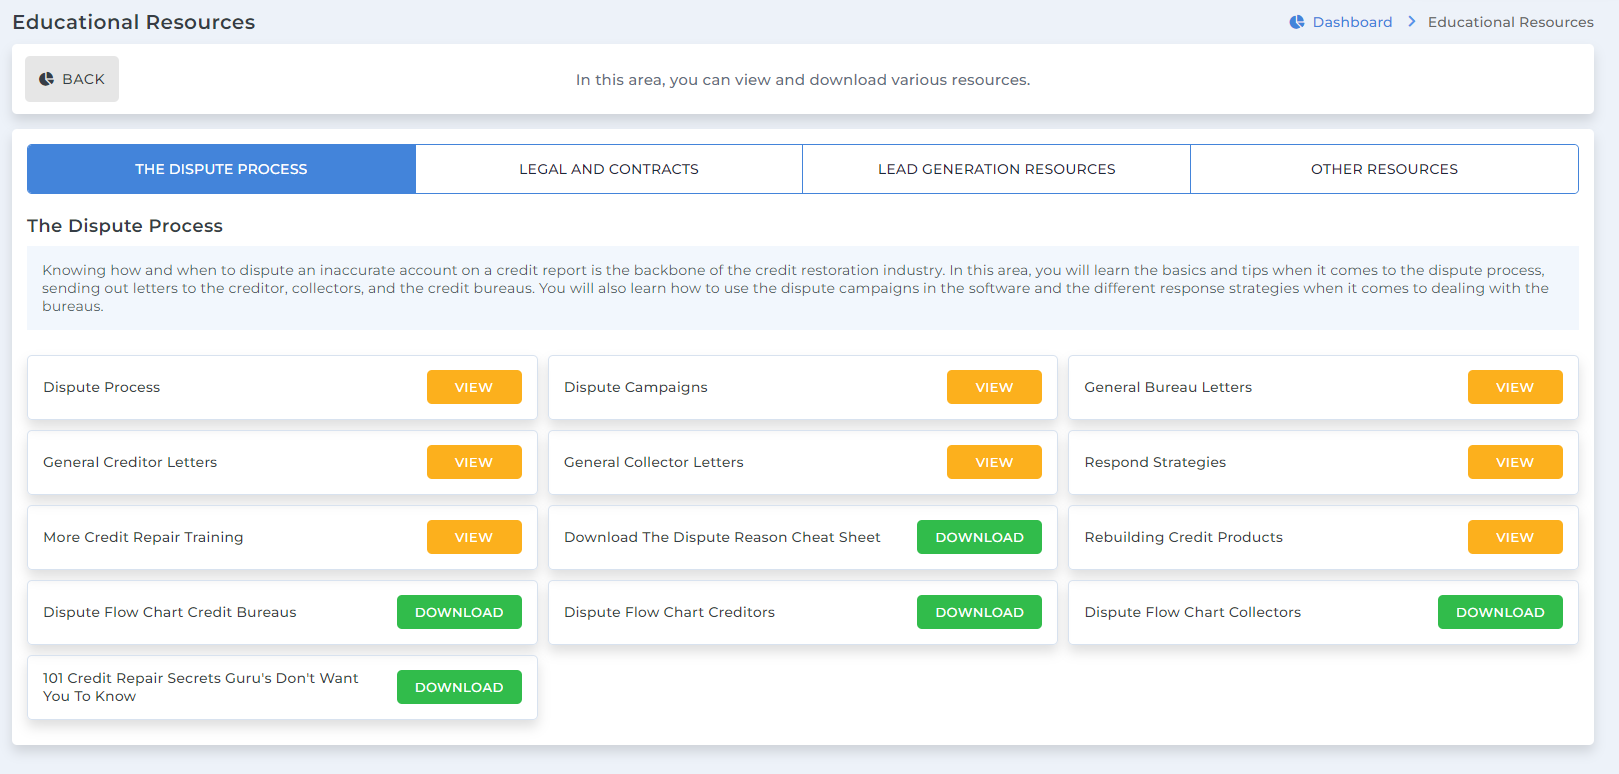
To help you understand how to use and when best to use each one, you can watch the free training videos under Dispute Process training. You may also maximize a dispute guide that gives you a summary of what the letter is about.

Step 8: Printing with Bulk Print Screen

At this point, you are doing fantastic and are almost done with the whole dispute process.
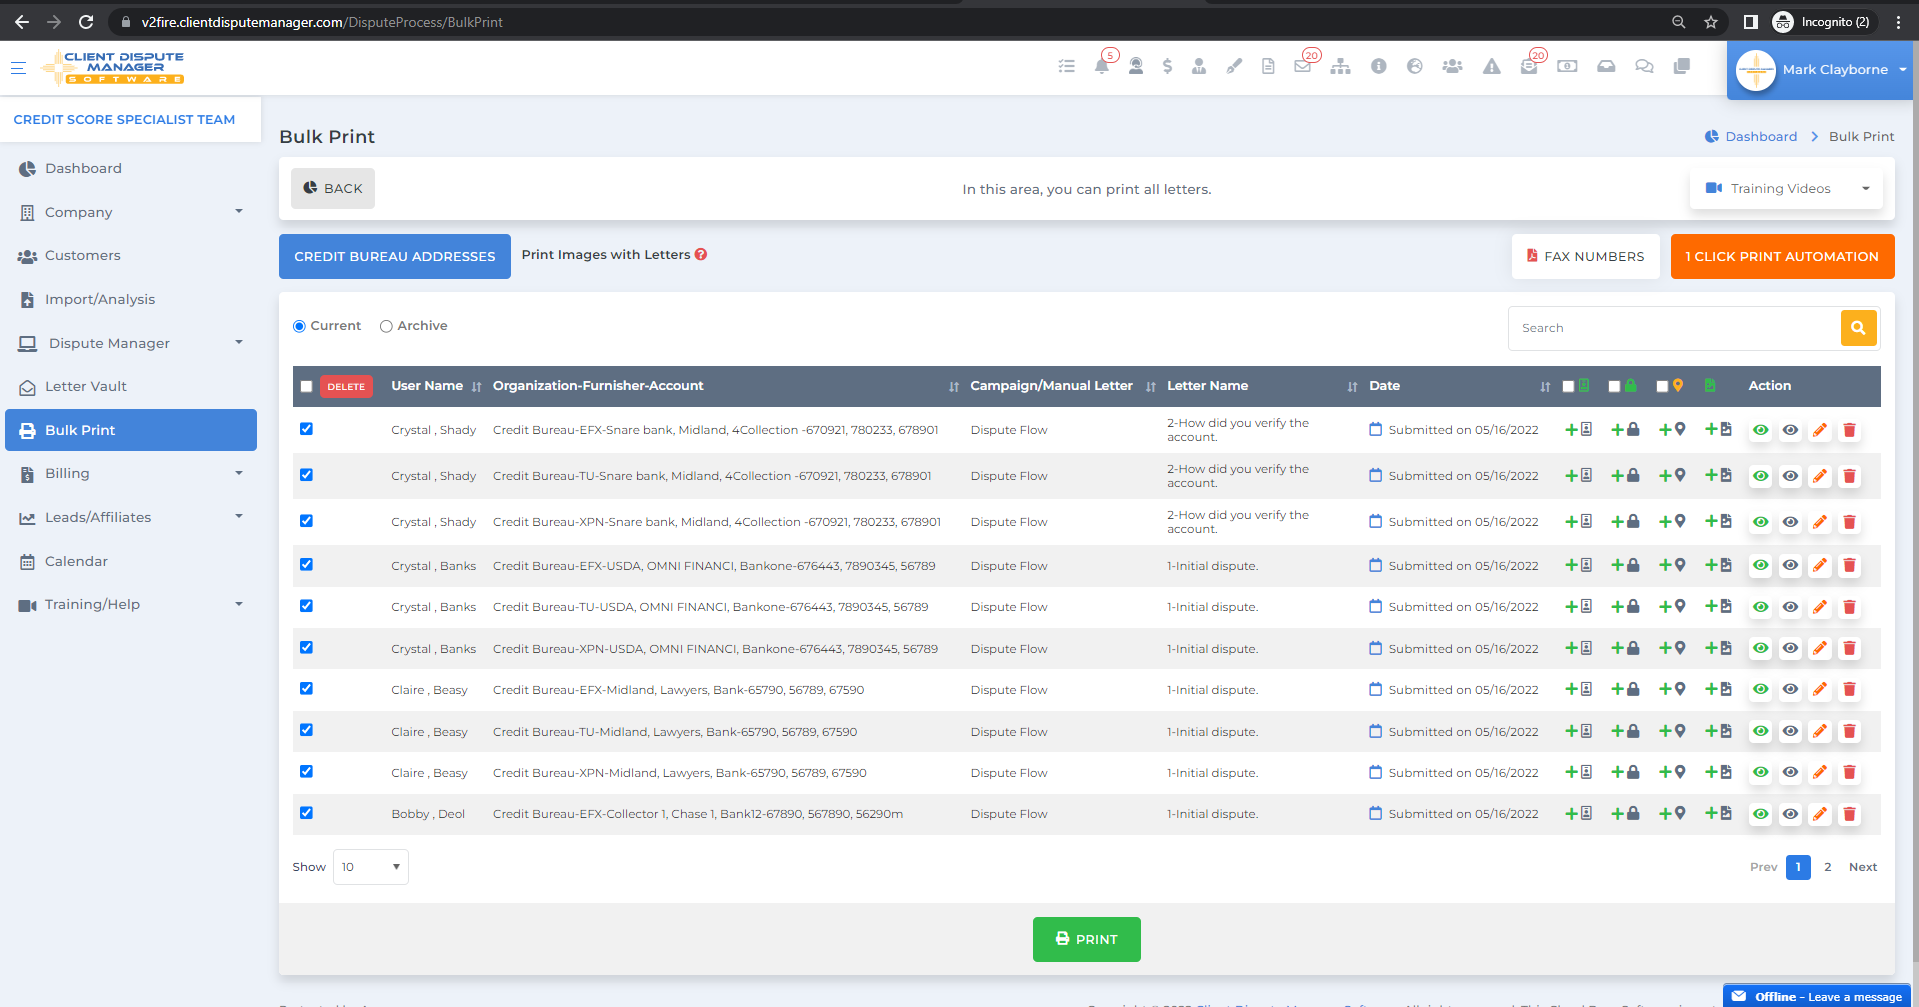
The last step is to print and mail the letters you built. You can print and mail them using two different methods.
Regular Printing and Mailing Process
This is the method we are all accustomed to using. We prepare the office supplies needed, print the letters, prepare the envelopes and get them mailed through the post office.
Now, to save time and money, the Client Dispute Manager Software offers a fully automated way of printing and mailing.
Credit Repair Software Integration with LetterStream
LetterStream is a third-party platform that covers the printing and mailing of letters.
With this integration, you don’t have to purchase office supplies, print, and prepare envelopes. Through the bulk print screen- you just have to click on send to LetterStream, and LetterStream will handle the rest.
Be your own boss. Set your own schedule and travel when you want. Start a credit business today.
Click here to get everything you need for FREE.

Step 9: Set Up Your Billing

You did an awesome job following through each step and finally completed the cycle. It is now time to determine your billing options. Before you go deep into understanding all options, know it is important to understand your federal and state law.
The Client Dispute Manager Software, as a credit repair business software,  is in full compliance with this, and we want to help you understand all the laws surrounding our industry when it comes to collecting payments from your customers. It is recommended that you review your State law, the Credit Repair Organization ACT, and the TSR (Telemarketer Sales Rule).
Your Options:
  • Tracking Cash Payments
  • Tracking Check Payments
  • Invoicing
  • Integration with Authorize.net

Step 10: Other Features of the Client Dispute Manager Software

Now that you are fully set up and have your process to go through daily, it is time to learn about other features of this credit repair software that can help you run and grow your business to the next level.

  • Employee Management – add employees, provide them with their access where you have full control, and allow them to chat with you internally.
  • Lead capture forms – integrate capture forms to your website for more leads to come through.
  • Manage Affiliates – add partners that will bring more business to you
  • Nurturing Scheduler– automate your nurturing process for all your active clients.
  • To-do list and Reminders – set up reminders so you won’t miss any task
  • SMS with Twilio – communicate with your clients in the form of a text message
  • Zapier Integration – automate further any task outside the software
  • Portal Access – keep your clients updated in real-time to deliver exceptional customer service.
There are many more features to get to know and features coming soon.

Step 11: Getting the Assistance you Need

Congratulations on reaching the last step! We the Client Dispute Manager Software Team will always be here to guide you and help you when you need it.
Credit Repair Software Training
Our team of experts is available from Monday – Friday 8:00 am to 12:00 am EST and Saturday – Sunday 10:00 am to 6:00 pm EST through the following channels:
  • Chat with us through the software chat pop up from any screens
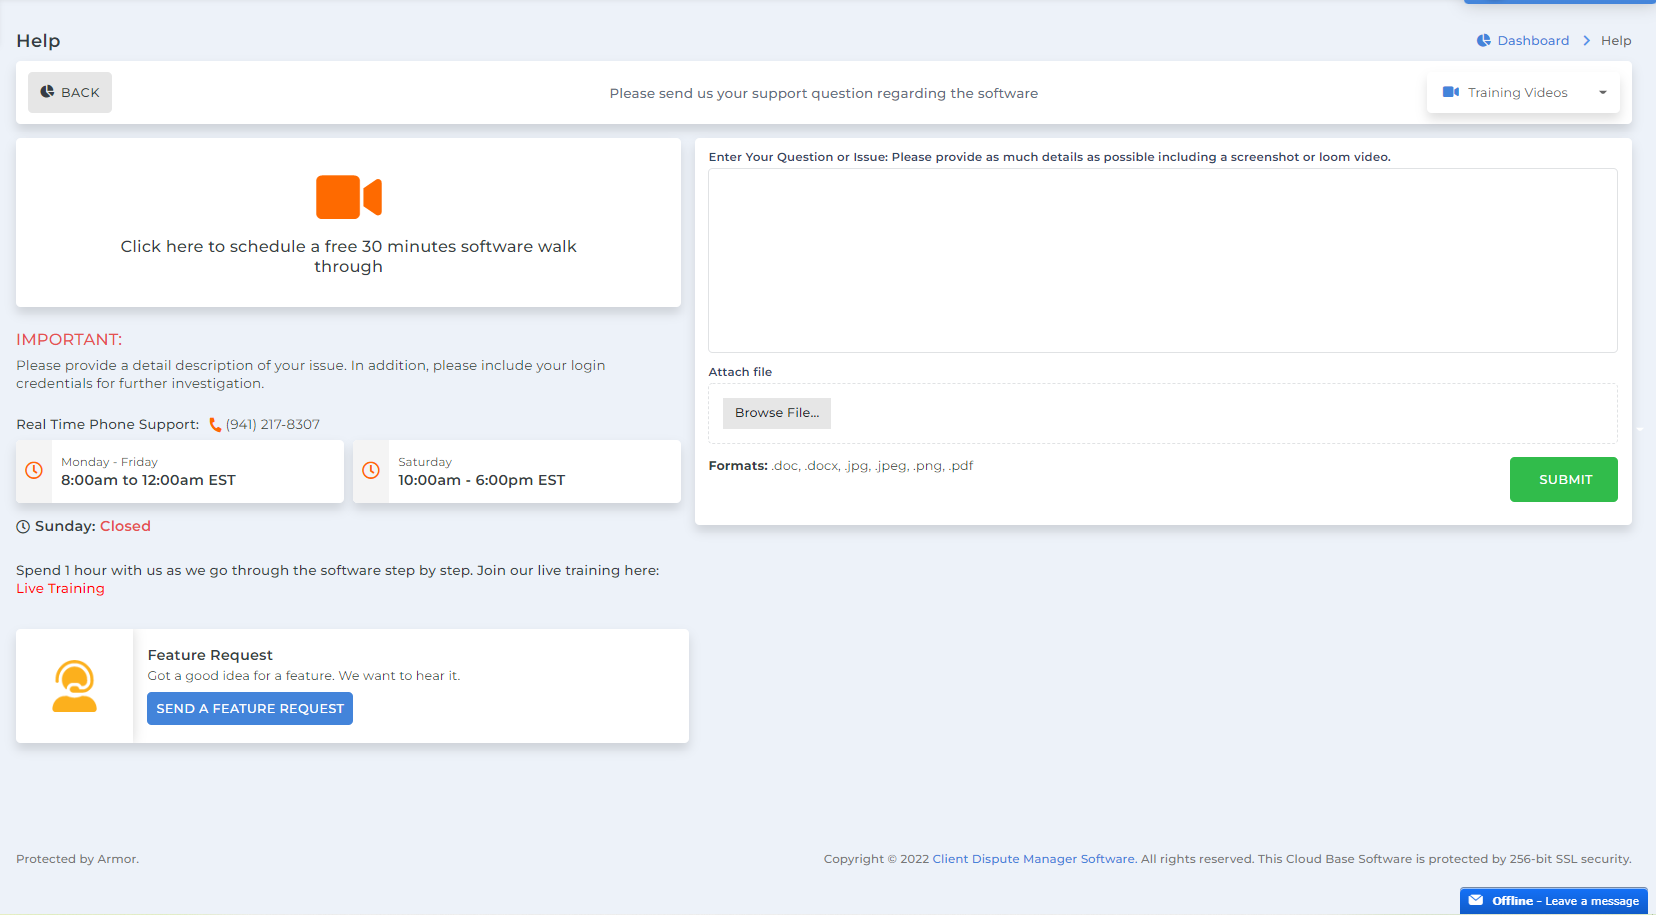
  • Send a support ticket through the Help section of the software
  • Book a free 30 minutes software walkthrough (unlimited at least once per day)
  • Call our real-time phone support hotline at any time during business hours
  • Watch different training videos under the training tab
  • Join in on our live training every Monday, Wednesday, and Friday at 2 pm EST
  • Email us at [email protected]
This credit repair business software won’t let you down and will help you understand how to maximize using every feature in the Client Dispute Manager Software.
Be your own boss. Set your own schedule and travel when you want. Start a credit business today.
Click here to get everything you need for FREE.